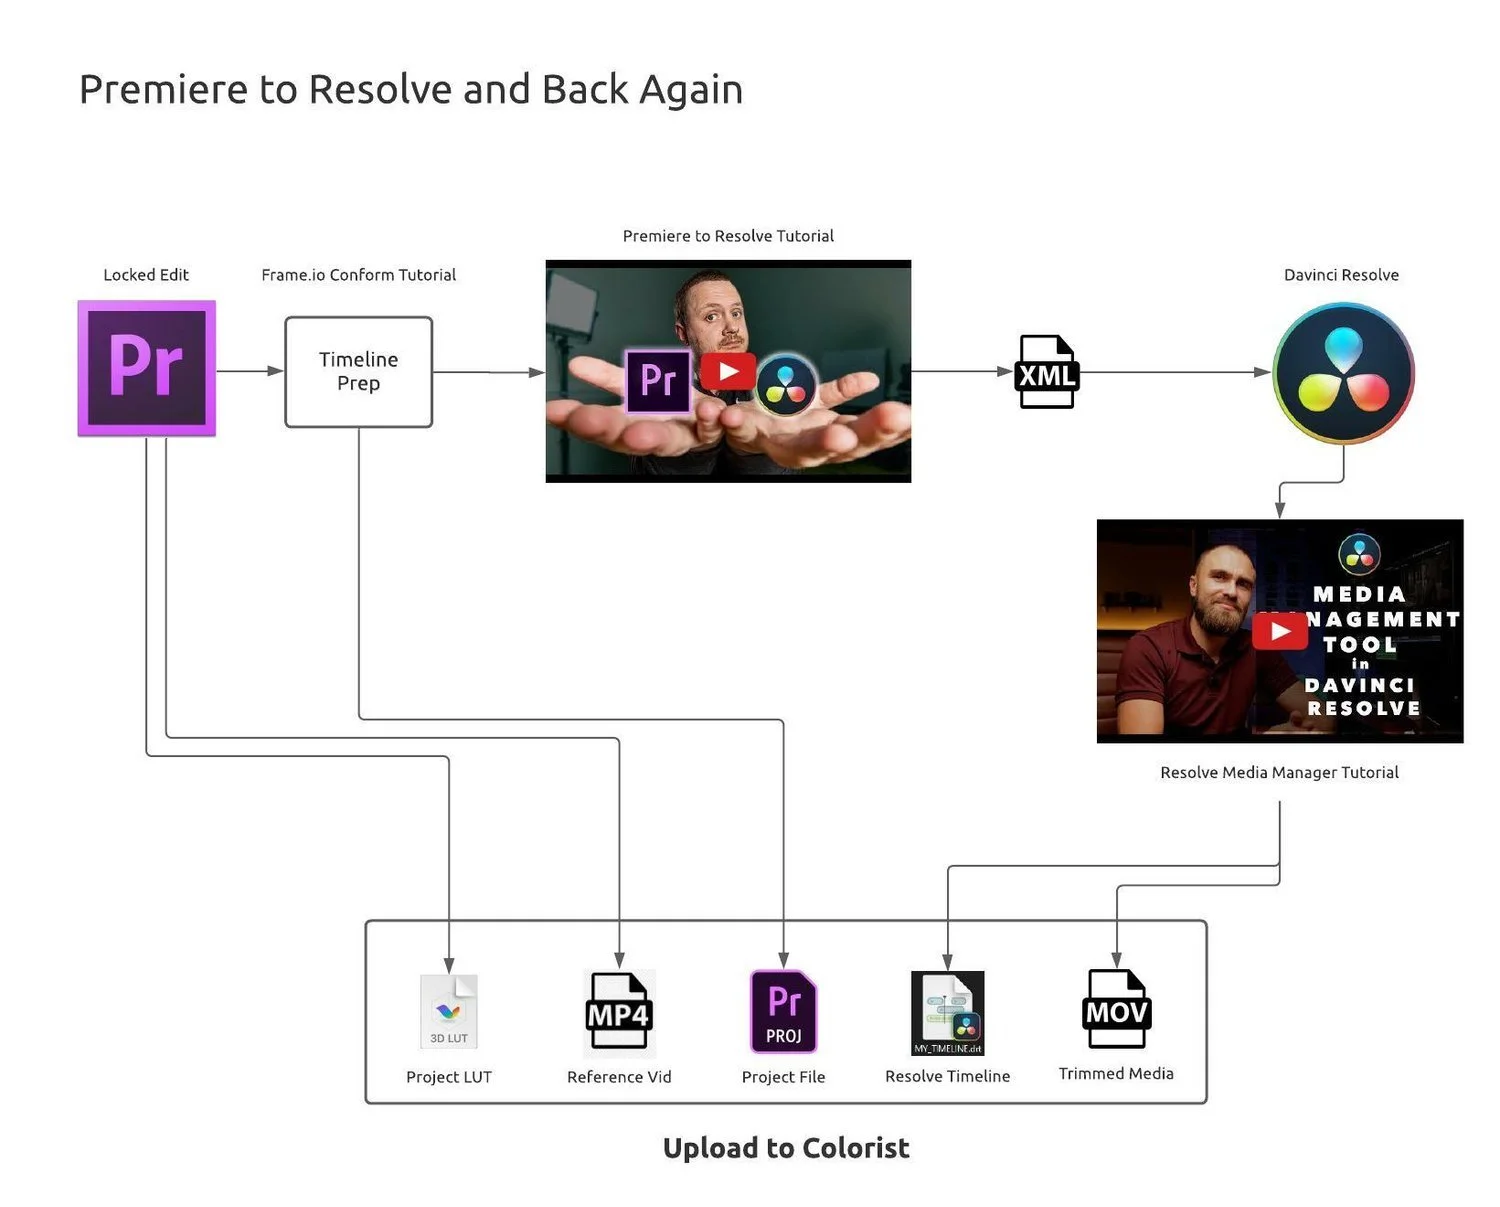
It’s 2021 and the world has gone remote. Covid, zombies and high office rent during an uncertain time is pressuring those of us in post production to innovate and “conform” to a remote working world. I would say that that the vast majority of my clients are remote. In fact, I haven’t even met some of my clients in-person. Such is the digital world we live in. Below is a nice round trip workflow that I use for Premiere Pro post production teams to prepare for color.
Step 1: Export a Reference Movie
Export an MP4 movie from your master project file. Do this for every timeline which will be going to color. This will be used as a ground truth for quality control for the entire round trip so be sure that this video is frame accurate to the edit. If this file is off by even a single frame, it will cause a shit load of problems for everyone else in the pipeline.
Step 2: Prepare Your Timeline
Read this comprehensive guide from Frame.io’s amazing blog and prepare your timeline/s BEFORE exporting your XML/s.
Step 2: Export an XML and Open in Resolve
DO NOT USE THE PREMIERE MEDIA MANAGER TOOL. Adobe does not have the licensing to trim RAW media in order to trim and consolidate. Plus, Premiere is just dumb. The Resolve media management tool is much more sophisticated and simple. You’ll thank me later. Follow the steps below to transform into a beautiful media managing butterfly.
The video below will show you how to export an XML file from your Premiere Pro timeline/s and then open in Davinci Resolve. You might be wondering why YOU as an editor or assistant editor need to have anything to do with Resolve. Well, because colorists charge $100/hour or more so I highly recommend that you save money by having your assistant editor handle as much of the turnover as possible. Most importantly, your colorist should be spending more time COLORING and not conforming. We’re often on tight deadlines in post so why would I want to squeeze a couple hours out of my morning reconnecting media and cross referencing timelines with a reference movie??? I’m a colorist. Sheesh…
Step 3: Prepare the Davinci Resolve Project
If you don’t have Davinci Resolve installed then you should do that now. It’s free! Just download from Black Magic Design’s website. Keep in mind that we will not be sending the colorist a Resolve project file, but instead we will be sending them a Davinci Resolve Timeline (.drt) which will be generated during the media management process later.
Once you have your Davinci Resolve project opened and have imported your XML files from above, you’re going to need to validate that the XML conformed properly by comparing to a REFERENCE MOVIE. Below is a short 2-minute video on how to do this. It’s not rocket science.
Step 4: Davinci Resolve Media Manager RULEZ!
Here’s where this whole process comes together in an angelic song of victory and enlightenment. Since remote workflows require an internet connection, we want to shrink the project down into a portable size. Now, you might be wondering how we can do this if you’re working with RAW media like ARRI RAW or RED’s R3D format. Worry not. Davinci Resolve has the license from these companies to “trim” their proprietary RAW formats to the in-and-out points specified in the timeline. GENIUS! The only company that has not agreed to this is CANON with the new RAW Lite format. I understand this is in the works and may, in fact, have been made available by the time you read this. Below is a video on how to use a shrink ray in Resolve.
Step 5: Upload Files Using Frame.io Transfer Tool
The Davinci Resolve - Media Manager will export a trimmed version of your project along with a .DRT file into a folder for each timeline. This folder of goodies is what you should send your colorist. I hate Dropbox and Google Drive for a number of reasons, but my main beef is that their upload/download management protocol sucks. If you’re still using the browser to transfer large files, I’m about to change your life.
If you’re a paying subscriber to Frame.io, download their free desktop app called Transfer Tool and install it. Not only is Transfer Tool up to four times faster for transfers, but it will also recommence uploads/downloads if there is an interruption to your net connection. All of this means that if your internet connection is a bit, shall we say, SLOW then this tool will save you a lot of time and headache. We’ve all had the dreaded CONNECTION TIMED OUT message after a five hour upload.


