Before I started a post-production finishing company, I spent fourteen years behind the lens as a cinematographer. Most of my work was in documentary film and television, although I dabbled in scripted narrative from time to time. One of the principal differences that I’ve noticed between these two worlds, is that narrative filmmakers invest a considerable amount of time and resources into technical preparation prior to principal photography. Media workflow, camera testing, and conference calls with your post team are standard practice when narrative filmmakers prepare to shoot a movie. Although cinematographers, sound recordists, and other technical creatives often float freely between the two worlds of narrative and doc, the producers and directors of independent documentary often do not. Doc filmmakers come from all walks of life and this is what I find the most refreshing about working with them. However, the technical demands of narrative filmmaking instills a rigorous attention to detail and healthy paranoia (for good reason) that requires key creative team members to build processes and checklists for every step of the filmmaking process. The resources required for this type of preparation are rarely accounted for in the ad-hoc universe of documentary. This blog entry is a simple guide to how you can incorporate more technical preparedness into your next documentary production in order to streamline for a better post experience with superb results.
Finding a Colorist
Depending on your budget, you may or may not be intimidated by the prospect of hiring a colorist for your film. Fear not! Many post finishing houses can be flexible with you and can often find a solution to fit your needs. Finishing labs will often have a range of creative professionals with varying experience levels. This means that your self-financed independent documentary that you bootstrapped could be the dream project for a hungry junior colorist looking to build their portfolio. In this sort of situation, there is often a senior colorist who will quality control the work of the junior team members with feedback, technical advice, and creative ideas. Good business is built on good relationships, so if there is time in the schedule, I’d rather one of my color labs to be working than to have it sit empty. I would hate to miss the opportunity to work with the next Elizabeth Vasarhelyi! If you’re upfront with your budget constraints, you might be surprised with how accommodating colorists can be. This will also help define the color process clearly and openly.
Before you begin shooting a single frame of your movie, you should have a colorist signed on to the project who is willing to consult with you on the technical side. Some filmmakers have a creative vision before they begin shooting, and this can also be part of the initial consultation. Your DP or other filmmakers in your professional circle might have a recommendation for a colorist that they’ve worked with previously. You might want to consider approaching a post finishing lab that can also provide sound design and mixing services so that it’s a one-stop-shop. By bundling the entire finishing process under one roof, you will save money as well as streamline the process for less headaches and time on your end. We will be posting more information on post-production sound in a later article.
Initial Conference Call
Once you have assembled your post-production team (Avengers assemble!), I highly recommend that you schedule a conference call with everyone so that all technical requirements and strategy is aligned. This simple step is the single most important thing you can do to minimize headaches in the finishing process. I can tell you from experience that there can be a LOT of headaches in post, most of which are expensive, frustrating, and entirely avoidable. Take copious notes during the conference call, and make sure to ask for clarification if something is still fuzzy. Documenting the call, and then following up with an email to the entire post team with the minutes will also ensure that everyone is on the same page. Documentation is a critical part of the post process. You can simply keep an ongoing email thread with your team or you can create a shared Google document which outlines technical specifications, workflow strategy, schedules, and deliverables. Here at Magic Lantern, we create something we call a one-sheet which has all of this information in one place for all team members to reference. Regardless of your documentation methodology, you’ll find that coordination via a single reference source will mitigate risk and confusion as well as reduce redundant communication.
I recommend having the following post team members on the call: editor, DP, sound recordist, colorist, sound designer/mixer, and the assistant editor at the finishing lab. If you have a post supervisor, they should be managing the conversation. Below are the discussion topics that should be on the agenda for the conference call:
Camera System
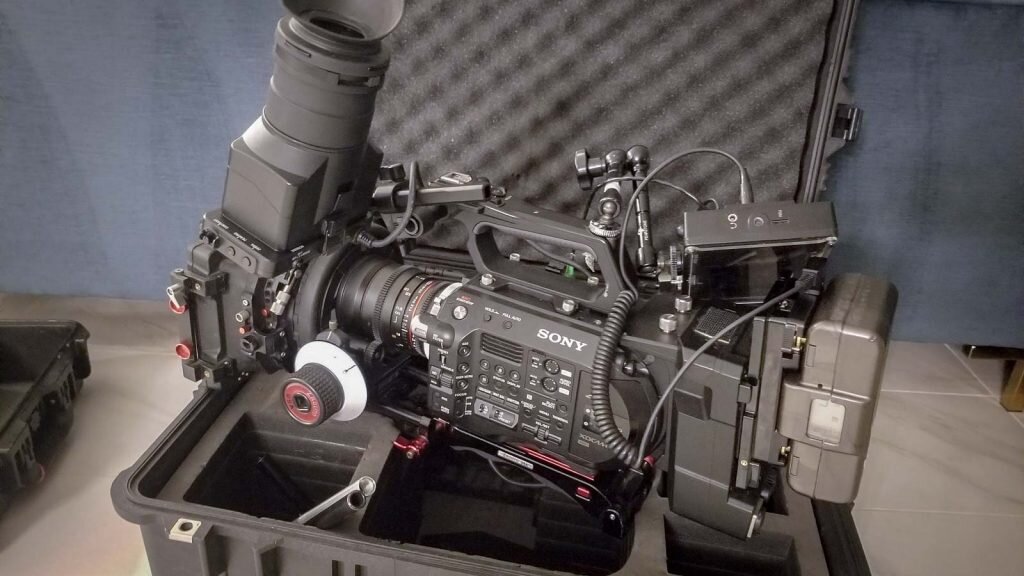
Sony FS7
Your colorist will want to know which camera system you’ll be using. Every camera has a specific set of characteristics which might require custom settings in order to plug into the post process most efficiently. Your colorist and DP could have an offline conversation about the specific system/s you plan to use for your film. Your colorist might have some handy advice on the quirky character and limitations of the camera system/s. If you are working with multiple cameras on the same project, especially of various brands and models, this will need to be discussed in detail with your colorist. Some cameras do not play nice together, however, there may be easy steps to take to minimize these differences.
Log, LUTs, and Color Science
If you’re planning to do a color grade, I would highly recommend that you shoot in Log in order to capture as much information as possible. This will give you the best creative flexibility in post. When shooting in Log, your DP will likely be utilizing a LUT (Look Up Table) which will need to be documented and shared with your editor and colorist. This LUT can be applied to the editor’s timeline so that you don’t have to watch a “flat” looking timeline. This LUT might also be a good starting place for your colorist. I recommend utilizing the LUT provided by the manufacturer of the camera you are shooting on since this will provide the best contrast and color conversion. This LUT will also be provided with the camera as a monitoring LUT so you can maintain consistency from set to post.
Monitor with a LUT that is close to what you imagine for the final look.
Speaking of color, cameras have a specific spectral response and when shooting in Log, your colors will often seem muted or even strange. It’s easiest to spot these characteristics with skin tones which can often appear to be greenish/yellowish or unhealthy. This is most likely due to the fact that your DP is utilizing a camera specific color science which has yet to be translated to your monitor’s color science. An example of a manufacturer’s LUT could be a Log — ->REC709 transform. Make sure to document which Log and color science you are shooting with. Although there are many custom LUTs on the market, I recommend sticking with the standardized LUT provided by the manufacturer because you will find that it has the most compatibility with creative tools and plugins later in post!
LEFT: Sony Slog3SGamut3.cine original // RIGHT: Sony Slog3SGamut3.cine —> Rec709 LUT applied
Codecs, Bit-rate, and Sub-sampling
If you are, in fact, shooting a documentary you’ll likely want to use a recording format which plays nicely with card space. Lucky for you, there are a few formats which maintain a lot of information while also being economical with hard drives.
Digital cinema cameras nowadays come with multiple recording formats, each with their own limitations. Newer and more robust codecs have the ability to record color information at higher bit rates for Log images like 10-bit with 4:2:2 chroma sub-sampling. The conversation that takes place between your DP and your colorist on these specs will likely be closer to a negotiation. You can use a free tool like AJA Data Calculator to quickly estimate the amount of hard drive space required for each codec and bit rate as well as how often the DP will need to change cards while filming. This is where consultation from your colorist will become very handy as they can help guide you and your DP on which format will best suit your needs. Don’t be afraid to ask dumb questions. Colorists love to geek out about these esoteric details!
Resolution, Aspect Ratio, and Frame Rate
Being that it’s the year 2020, you’ll likely be shooting in 4k. Do keep in mind however, that there are a couple of flavors of 4k. 4k UHD (3840×2160) is a standardized widescreen aspect ratio for consumer televisions, laptops, and mobile devices. 4k DCI (4096×2160) is a slightly wider aspect ratio standardized for theatrical distribution and festivals. Today, we stream just about everything on devices that really don’t care which format you use. These standards are remnants of a time when filmmakers were limited to the proscenium of good ol’ television. I often have clients who shot their film not actually knowing that there were even differences in 4k formats. They saw the 4k in the menu and simply selected it. There are pros and cons to each and every resolution and aspect ratio. Your colorist can help you decide which one works best for your film. Regardless, your team will all need to be on the same page on this particular issue as it will have an impact on hard drive space and computational resources.
One specific note about 4k DCI 4096×2160 is that this is the non-arbitrary pixel resolution required for a DCP which will likely be a request from a film festival. If you shoot in standard UHD 3840×2160 and then export a DCP, you will have pillar boxing on the sides of your frame at the cinema. If you shoot in 4k DCI 4096×2160 and export for the web, you will have letter boxing on the top and bottom of the frame when playing back on a computer or portable device. Something to keep in mind when choosing a standard format.
Your frame rate is an absolutely critical spec that the entire team will need to know in order to setup their projects correctly. Although you will likely be recording at 23.98fps (23.976 to be exact) if you are in North America, you should make sure everyone knows this. Your sound recordist and your DP should coordinate on any time code changes or specific requirements like drop frame vs non-drop frame, jam syncing, scratch tracks etc. If you are working with multiple frame rates such as archival, foreign footage, or scanned film (24fps proper) then this should be documented and communicated with the post team ahead of time.
Calibration
When possible, especially when shooting interviews, it’s helpful to record a color chart on set under the key light source. If you don’t have a color chart, a gray card or even a white piece of paper (not overexposed) will go a long way in adjusting color balance to ensure consistent skin tones and overall color. Since your colorist will know the Log and color science used during the shoot, they can use this information to get the image halfway there with a few simple steps. Calibration charts or gray cards can also be helpful in situations where you expect there to be various color temperature sources. If you’re shooting in the same location for long periods of time under similar lighting situations, a single short clip of a gray card or piece of paper can be used for much of the same material.
The SpyderCheckr – Color Calibration Chart by Datacolor
Shooting Guide
If your project requires you to work with multiple DPs, creating a shooting guide will help to ensure a more consistent look across your timeline. Based on your initial conversation with your colorist, you can document the recommended camera settings from the conference call onto a separate pdf file which you can then email to each DP as a quick guide. Using the same camera system and settings for each shoot is best, but your colorist can also help guide you on how to best mix various camera models and their corresponding settings.
Workflow and Media Management
Everyone has their own methodology for organizing vast quantities of data in the digital age. File hierarchy, nomenclature, and labeling are more of an art form than a technical skill. Organizing information so that it is not only easy for a human to navigate, but for a non-linear editing system like Premiere Pro or Avid to navigate as well.
Drive Management
There are too many variables involved in hard drive choice to list here, but just remember that you’ll want to design the most efficient data management possible from shoot to post in order to save time and money. For example, it might be worth the few extra dollars to purchase a thunderbolt external hard drive for on-location media backup. Perhaps you drop the extra cash for a more expensive shuttle drive for media backup, and a less expensive repository drive back at HQ for the editor to work from. However, if you’re working from slower drives back at HQ, you may have to edit with offline media which means you’ll need to consider a specific offline workflow when preparing to conform for the color after picture lock. The point is, you’re entire media pipeline should coordinate well with your post productions strategy. Having your DP, editor, and the assistant editor at the finishing house discuss this beforehand will likely save you money in the long run. The more time you spend copying files in post means more billable hours. If you do the math, you’ll see that thinking through to the end of the pipeline becomes more of a strategy of economics!
Drive Format, Cables, and Labeling
Be aware of which operating systems everyone in the post pipeline is using. Utilizing a multi-OS format like ExFAT means that the drive can be read by both Mac and Windows. Also, you will want to consider which cable connection your drive uses to maximize compatibility. USB-C is fast becoming a multi-platform standard and can handle higher bandwidth read and write loads. Older thunderbolt connections that are not USB-C are not easily compatible with Windows. Although most of the film industry uses Mac, the more powerful post production finishing systems are often Windows. Also, keeping a record of your hard drives in a Google spreadsheet is very helpful in keeping track of where all of your project assets are. This is particularly critical when working on longer form documentary features or projects that require many recording sessions. By labeling each hard drive and documenting each drive by some sort of name/identifier will not only keep you organized but will also help you troubleshoot if something goes missing or gets corrupted.
Oh, and ALWAYS maintain redundancy. Keep two copies of everything and never keep the redundant drives in the same location, especially if you have a cat with a particular affinity for glasses of water. You may also consider asking your post finishing house if they have the server space to keep another copy of your project.
Nomenclature and Hierarchy
Documentary films often require hours of footage and thousands of clips. Each one of these clips should have a unique name and should be organized on your hard drives in a specific way so that everything can be found easily and intuitively. Frame.io recently published a fantastic guide to file naming practices which we’ve been using at Magic Lantern for a while. One of the worst case scenarios for a documentary filmmaker is to find themselves in bedlam with ten thousand clips and not a clue how to reconnect in order to export the final film. Most doc filmmakers I know are always giving themselves deadlines in order to wrap up the project for festival submissions. While a skilled assistant editor can save you with a solid post-mortem on this kind of situation, it will eat into your bank account dearly!
Scheduling and Checking In
Give your post team a rough idea of your shooting schedule. If you have particular deadlines, let your colorist know so they can make sure there is a color suite available. Check in with your post team if you have any questions or concerns during principle photography. If there will be a delay in picture lock, notify your colorist so that they can free up the color suite, especially if they’re doing you a solid 😉
Picture Lock and Conform
If this is your first time conforming from an editor to a colorist or post lab for finishing, I recommend you read this chapter from Frame.io’s workflow guide to help you through the process:
The Ultimate Workflow Guide - Frame.io
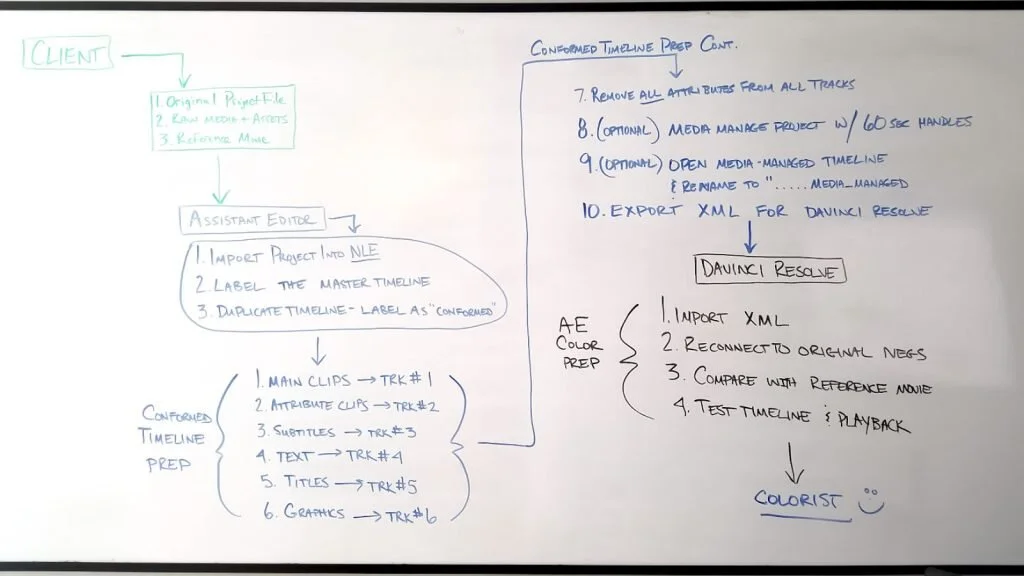
Once you’re picture locked and assuming your editor has managed to keep a firm grip on their sanity, it’s time to prepare for the conform! This is essentially the delicate process of porting the edit over to the finishing lab for color grading and sound design/mixing. This process is yet another step which tends to trip up doc filmmakers, particularly those with complex timelines, various media formats, aspect ratios, subtitles, graphics, and VFX. The good news is that, once again, a skilled assistant editor can crush this process and make it completely painless for you. As a filmmaker, you should be focused on the creative and storytelling process and not on reconnecting missing media. All you have to do is to remember to schedule one last conference call with your post team to ensure that everyone is on the same page. Once again, take minutes and send to everyone on the post thread. Make sure to include the specific deliverables required for output as well. Thus, the circle of life in post-production is complete!


